Showing posts with label cheese. Show all posts

Monday, September 10, 2012

Bacon Wrapped Jalapeño Poppers

I have always loved sports, but really only follow basketball, well mostly, the Portland Trail Blazers. Okay, I'm a huge Blazers fan. I could go on, but I'll spare you for now. I played fantasy basketball last year and finished second in the league - not too shabby for a rookie. This summer, I was somehow convinced to join my best guy friend Andy's fantasy football league, probably for some easy competition. At the time, I could not name more pro football players than I have fingers and I still can't tell you what position a player is on the field at any given time, with the exception of the quarterback. Being from Oregon, we don't have a pro football team so my only loose ties lie with the Seattle Seahawks by default. (I did make it to my first Seahawks game last year though!) The only tailgating I ever partake in involves Oregon State Beaver football, so going to visit Andy up in Seattle during the opening weekend of the NFL was reason enough to try out a new recipe.

Andy loves spicy food and was drooling when I mentioned making bacon wrapped jalapeño poppers for Sunday football shenanigans. I like spicy foods, but can't handle too extreme of a kick. These were very tasty, but were nearly too much for me. I am not one to eat a jalapeño by itself, but add bacon to something and it's good to go. The cream cheese helps, too. Andy scarfed about 70% of them.


Not that jalapeño poppers are rocket science, but I based mine off of this recipe from Doughmesstic. (Isn't that just the greatest blog name? Dough + mess + domestic. It's one of my faves.) Not to worry, these poppers are very easy to assemble. 

Bacon Wrapped Jalapeño Poppers
Makes 12

Ingredients
12 pieces of bacon
12 jalapeños, seeded
6-8 oz. cream cheese, softened
2 teaspoons onion powder
2 teaspoons garlic powder
1/2 teaspoon black pepper
pinch of salt

Preheat your oven to 350 degrees. Partially cook bacon however you wish (stove top/oven/microwave) but just make sure you can still wrap it around a jalapeño. While the bacon is cooking, slice one side of a jalapeño lengthwise to open it up, in order to remove the seeds. Repeat for the 11 other peppers. Now, mix cream cheese with all of the spices. Spoon the cheese mixture into the seeded jalapeños. As you can see from photos, I may have stuffed my jalapeños with a little too much cream cheese, that is if you have a problem with exploding cheese. Finally, wrap each popper with bacon and place in oven safe dish. Bake for 35-40 minutes, until bacon is done.


Happy football season! Maybe this year I will have something more to root for (thanks to my fantasy football team) than the tailgate food. Fingers crossed!

Monday, September 3, 2012

Homemade Pizza Rolls

Yummmmmers.

If you've been looking for a quick and tasty food for tailgating or appetizer for you next party, you have to try these homemade pizza rolls. My sister was the one who wanted to make these and I'm definitely happy we tried them out.


It has been a while since I have made a recipe from one of my favorite food blogs The Girl Who Ate Everything. I forgot what beautiful photos she has on each post. This may be the first non-sweet I have made from her blog. This recipe is super kid friendly and super easy to make. Oh, and I would suggest doubling this recipe if you have a hungry husband, teenage son or have a hard time eating just one of anything small and yummy.

Homemade Pizza Rolls
Adapted from The Girl Who Ate Everything
Makes 8

Ingredients:
1 (8 oz) package refrigerated crescent roll dough
4 cheese sticks, halved
3-4 oz. pepperoni or Canadian bacon or sausage
1/2 cup pineapple, chunked (if you choose Canadian bacon)
marinara or pizza sauce or ranch, for dipping

Garlic Butter Glaze:
2 tablespoons butter, melted
1/2 teaspoon Italian seasonings
1/4 teaspoon garlic powder
1 Tablespoon grated Parmesan cheese

Preheat oven to 350 degrees. Prepare baking sheet with parchment paper or oil spray.

Separate the crescent roll dough and lay flat. Place toppings at the bottom, large part of the triangle. Add half a slice of string cheese on top of the toppings and roll up.


Arrange on baking sheet, seam side down and bake for 10-14 minutes or until golden brown.


While rolls are cooking, combine the melted butter, Italian seasonings, garlic powder and Parmesan cheese in a small bowl.

When rolls are done, remove them from the oven and brush with the garlic butter glaze. Serve with marinara or ranch for dipping. 


Mmmm. Butter glaze. Hard to go wrong here.

If you are a fan of crescent rolls, you definitely need to try a chicken broccoli cheddar braid or baked chicken cheese filled rolls.


This post is linked up to some of the parties listed under my Show & Tell tab at the top of the page.

Monday, May 7, 2012

Bacon Sun Dried Tomato Grilled Cheese

I love love love loooooove sandwiches, especially grilled sandwiches, so when the Mom's Crazy Cooking Challenge for May was announced: grilled cheese sandwiches, I was so excited. I can't wait to see all the recipes linked up and try some out myself. I found this recipe from Galley Kitchen and knew I had to try it out for two reasons.

1. Bacon - We have had a long standing affair since I was little.My dad introduced us. Bacon always wins and makes everything better. Try and convince me otherwise.

2. Sun Dried Tomatoes - Similar to bacon, when looking at a menu, as soon as I read something has sun dried tomatoes in it, I'm sold. Done. Costco sized jar love.

So, here we go.


Before I share the simple ingredients (I'm sure you can guess) needed for this tasty sandwich, I have to share the hilarious description Suzzana (of Galley Kitchen) used to describe her sandwich:
It tasted like a bright, fresh caprese salad got loaded on tequila and cheese fries, and woke up in a strange apartment, unsure of just who was posting true confessions on her Facebook wall all night long. It was delicious, and a little embarrassing.
 How could you not try this out?

2 slices bread, your choice
cheese, however much your little heart desires
sun dried tomatoes, again, to your preference
1/2 teaspoon garlic, roasted
1 Tablespoon butter


Now you're ready to rock and roll. It's quick and easy.

Cook your bacon to preferred crispy-ness. Butter two slices of bread on the outside.

Roast garlic on your stove top, or in your oven like Suzzana did. Then, spread across one slice (opposite the butter side) of your bread. [As I'm writing this, I just thought how yummy it would be to mash up a little avocado onto the bread, too. Next time!]


Add your cheese, layering your slices of bacon and sun dried tomatoes, as desired.

Grill it up til cheese melts and the bread is a nice golden color on the outside.


I love the cheese oozing out the side. Mmmmm.

Serve warm with a cup of soup always seems to be such a good combination. Or a side of extra bacon, as was my case.


Scroll down for all the rest of the Crazy Cooking Challenge participants' grilled cheese sandwiches!


This post is linked up to some of the parties listed under my Show & Tell tab at the top of the page.

Monday, November 7, 2011

Mashed Potato Cakes

Here is my first ever post participating in the Crazy Cooking Challenge hosted by Mom's Crazy Cooking. I can't wait to see all the tasty recipes linked up! This month's theme is mashed potatoes - must be potatoes and must be mashed.


Photobucket

I was excited to try this recipe I came across for Mashed Potato Pancakes on How Sweet It Is. This recipe is really quite simple, but boy is it yummy. These would really work for breakfast, lunch, after school snack or dinner.

You will need:

about 2 cups mashed potatoes
about 3 tablespoons flour
olive oil

I only ended up using 2 of these massive Russet potatoes for my mashed potatoes, which was more than 2 cups.


That is all you need for the basic mashed tater cakes. Make your best mashed potato recipe ever. Then add the 3 tablespoons flour to 2 cups of mashed potatoes.

I'm still searching for a delicious mashed potato recipe and am confident I will find it through all the awesome links for this month's Crazy Cooking Challenge listed below.


I love bacon and cheese with my mashed potatoes, so those were my two extra mix-ins. Feel free to add whatever else you wish. (Think baked potato toppings.) Here's how much I added to the 2 cups mashed potatoes with flour mixture.

4 slices bacon, cooked and broken into pieces
1/3 cup cheddar cheese, shredded 
sour cream, a dollop or two to taste


Now you are ready to make your mashed potato cake "patties." Anywhere from a 1/2" thick to 1" thick should work fine.

Heat your skillet to a medium high heat and as my favorite line in Jessica's recipie says, "Add your fat of choice [being bacon grease, butter or oil] and let it heat for 30 seconds." Her mom used bacon grease, which is doable if you plan on adding bacon. As contradicting as it sounds since these are not really healthy in any way, I chose to use olive oil as a healthier alternative to fry the tater cakes in.

Add a patty to the skillet. Be very careful of splattering whatever-type-of-fat you chose. Let brown, flipping after 3-4 minutes on each side.


I found that 2 cups of mashed potatoes will make between 10-12 hand sized mashed potato cakes. This was more than enough for my sister and I, as these were our side dish to chicken and we ended up having leftovers. I can vouch that they still taste good warmed up the next day!


These really are a fun twist on regular old mashed potatoes, giving them a nice crispy crunch with a soft middle. Definitely a good combo.


If you are interested in joining the Crazy Cooking Challenge, here are a few details: must make monthly themed food, posting once a month on the 7th and must use a recipe found on another blog (point being to highlight other bloggers). Please visit Mom's Crazy Cooking for more information. She is extremely thorough and helpful in how she runs this challenge. Thanks so much for hosting Tina! I'm excited to be a part of this!

Make sure to go check out some of the other mashed potato recipes linked up to the challenge! I'm already excited for December's Challenge: fudge. I am pretty sure I have already found my recipe and can't wait to try it out. Oh, and vote for this recipe by clicking the tiny "Like" under entry 59 below!

Wednesday, September 28, 2011

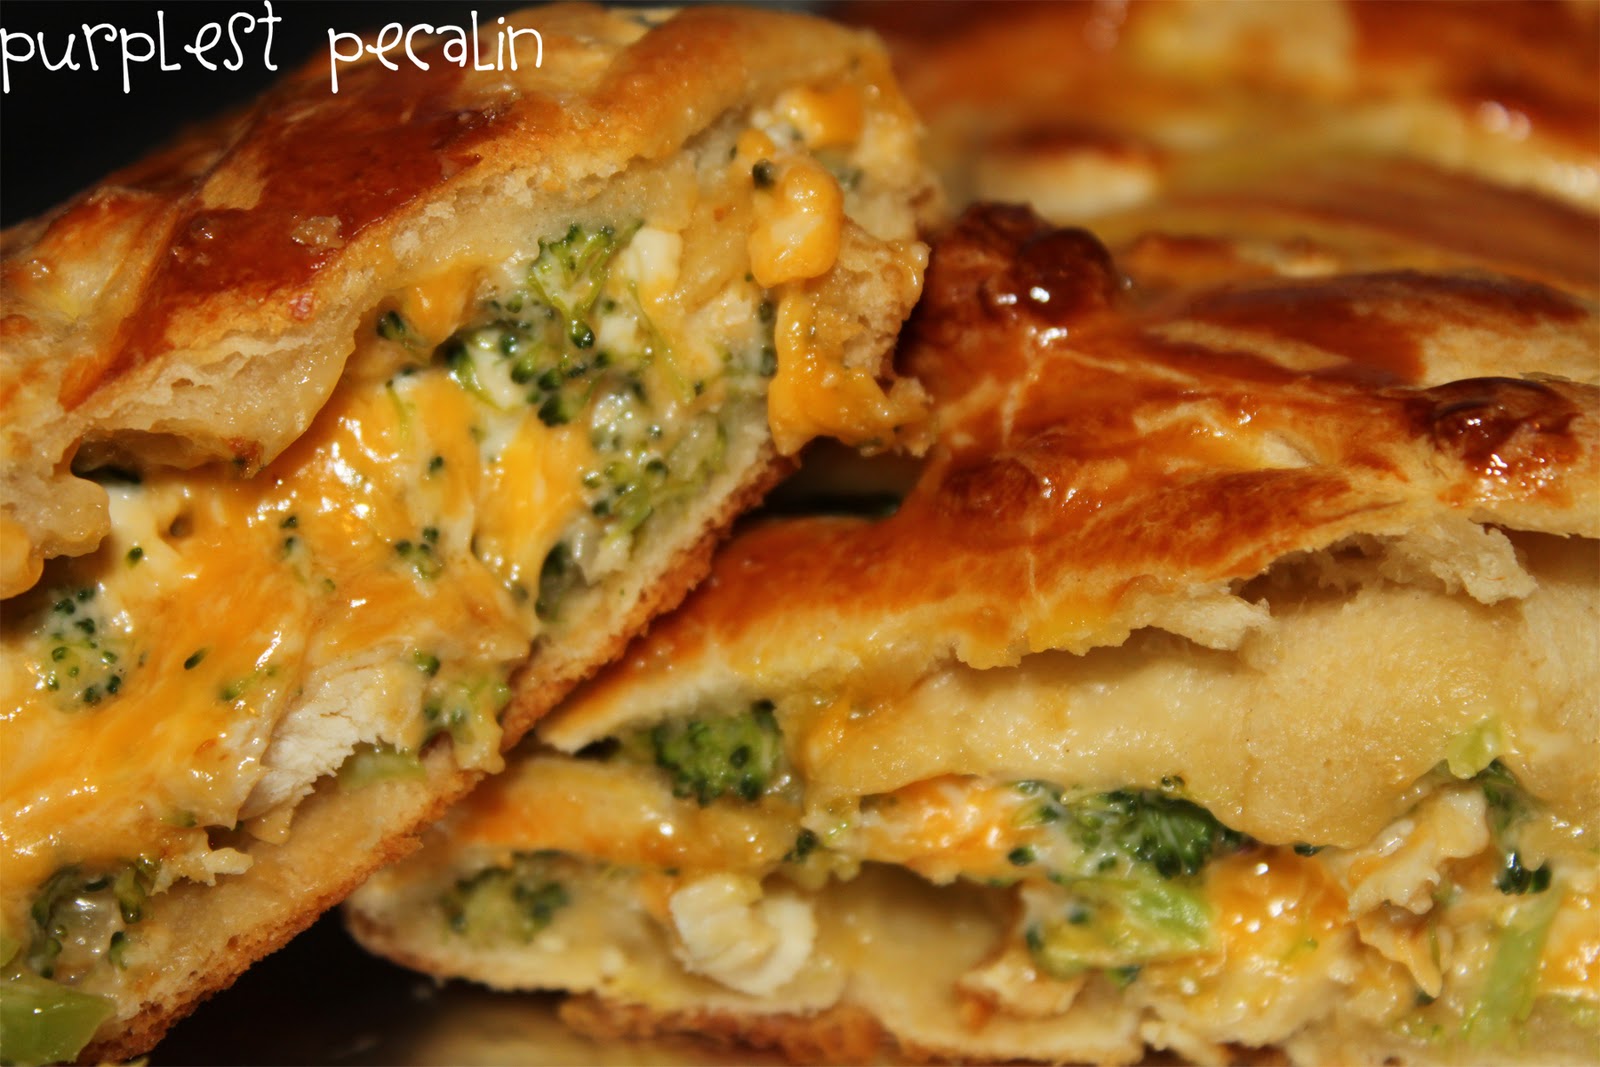
Chicken Broccoli Cheddar Braid

Tried another recipe from, you guessed it, Pinterest. Yet again, we were not let down. This time, it was a Broccoli Cheddar Chicken Braid by Cat from Food Family Finds.


Just like the Baked Chicken Cheese Filled Rolls we tried a few nights ago, this recipe also uses crescent rolls. This one is even easier than that one. It does call for fresh rosemary to be sprinkled on top of the braid. It seems as if I almost always don't have one ingredient and tend to just try recipes anyway, as long as I know it isn't a completely necessary ingredient. Also, the original linked recipe above is double the recipe below.

1 can crescent rolls 
1 cup chicken chunks, cooked
1 cup cheddar cheese
1 cups broccoli, steamed and chopped
1/4 cup light mayonnaise
1/2 egg yolk (approximately)
fresh rosemary
Preheat oven to 375 degree. On a parchment paper lined cookie sheet, spread can of crescents length wise to form a long rectangle. Press each of the seams to form a single layer of dough.

In a large bowl, combine chicken, cheese, broccoli and mayonnaise. Spread mixture over the center of the croissant dough evenly to create a log. 

Using a sharp knife, cut horizontal strips 1 inch apart down each side of the crescent dough. Fold the dough strips over the top of the chicken mixture, alternating left and right to create a braid.
Brush the top of the braid with a beaten egg yolk and sprinkle fresh rosemary on top.
 
Bake for 26 – 28 minutes until golden brown. (If you use this recipe doubled to what the original post calls for, the bake time is 28-30 minutes.)

Halved recipe shared here serves 4.


Have you already thought what my sister and I voiced almost in sync while enjoying this for dinner? Yes, we thought bacon should most definitely be added to this recipe next go around.

Tuesday, September 20, 2011

Baked Chicken Cheese Filled Rolls

Oh boy, do I have a recipe to add to your weekly dinner plans! If you plan that far ahead, that is. But seriously, check out the ingredients, put them on your grocery list and give this easy chicken dish a shot. No one will be disappointed. I'm sure.


My mom and pickiest eater in the fam, my 14 year old sister came over to try out this meal for dinner She even liked it, which made my mom quite excited to be able to add a new recipe to mix up dinners with.

Not surprisingly, I found this recipe on Pinterest. (Maybe my blog should be re-titled to "Made from Pinterest.") Anyways, it was originally posted by Steph from Plain Chicken. I just realized that this is the same blog that posted the recipe I based my super addicting Bacon Ranch Cheese Pull Apart on. Hmmm. She sure knows how to please. I will be scoping out the rest of her site, instead of waiting til one of her other surely delectable recipes pops up on my pinterest feed.

Here's the recipe Steph adapted from recipezaar.com:

2 (8 ounce) cans Reduced Fat Pillsbury Refrigerated Crescent Dinner Rolls
1 (10 3/4 ounce) can 98% fat free cream of chicken soup, undiluted
3/4 cup grated cheddar cheese or swiss cheese (or any cheese of choice)
1/2 cup milk

Filling
4 ounces cream cheese, very soft (fat free or less fat work fine)
2 tablespoons butter, very soft but not melted
1/2-1 teaspoon garlic powder
1 tsp minced onion flakes
2 large cooked chicken breasts, finely chopped (or use about 2 cups, can use cooked turkey)
1/2-3/4 cup finely grated cheddar cheese
1/2 tsp seasoning salt
1/2 tsp ground black pepper (or to taste)
2 Tbsp. milk
1-2 cup grated cheddar cheese (for topping)

Set oven to 350°F. Spray a 9x13 dish with cooking spray. Mix together milk, 3/4 cup cheese and undiluted chicken soup (can season with black pepper if desired). Set aside.

To prepare the filling,  make certain that the cream cheese and butter are very soft.  In a bowl, mix the soft cream cheese with butter until very smooth, then add in garlic powder. Add in the chopped chicken, onion and cheddar cheese; mix well until combined. Add in 2 tablespoons milk; mix to combine (add in a little more if the mixture seems too dry). Season with seasoning salt or white and black pepper to taste.

Unroll the crescent rolls. Place 1 heaping tablespoon chicken mixture (or a little more) on top of each crescent triangle, then roll up starting at the thicker end. Drizzle a small amount of soup mixture on the bottom of the dish. Then place the crescent rolls seam-side down on top of the creamed mixture in the casserole.

Drizzle the remaining soup sauce on top (you don't have to use the full amount, just use as much as desired) and sprinkle with 1 cup (or more) grated cheese, or amount desired. Bake for about 30-35 minutes.


I edited the directions, as I found them a little scattered. You could totally prepare the filling the night before, so come dinner time, assembly is all that is required.

I took leftovers to work the next day and it tasted just as yummy, if not better (maybe I was just super hungry) than the first night. Who can deny cheese and bread? Not me.

Saturday, August 27, 2011

Bacon Ranch Cheese Pull Apart

I saw this concept on pinterest and couldn't help but find an excuse to make it. The pin was originally from Plain Chicken and I peeked at her recipe before just adding what I thought sounded yummiest. This meant adding mozzarella cheese (in addition to cheddar) and real bacon instead of bacon bits.


I bought a loaf of sourdough bread, uncut. After criss-crossing cuts into it, down to the bottom, but not through, I added apporximately:

1/2 cup cheddar cheese, shredded
1/2 cup mozarella cheese, shredded
8 pieces of bacon, cooked and broken into pieces
1/2 cup butter, melted
1 T ranch seasoning, mixed with butter, drizzled over entire loaf

Then, put in oven to melt the cheese.


We dipped it into marinara sauce and just couldn't get enough of it! Definite hit at our house.

Tuesday, February 22, 2011

Bacon Pepperjack Cheese Wrapped Shrimp

I love bacon. I love pepperjack cheese. I love shrimp. 


I never considered combining them all, until I visited my friend, Cara, in Texas and we drove to Baton Rouge, LA to visit our friend, Kaycie two weekends ago. Anyways, we ate so much food that weekend, the first dinner being shrimp wrapped in peperjack cheese and bacon, then deep fried. Surprise, surprise. It was sooooooo good, I thought I would try to replicate it, minus the deep frying.

My first attempt was last Friday night when my mom came over, sort of by surprise. It was a disaster - I cooked the bacon too long before trying to wrap it so it was too hard and just broke into piece and I didn't use enough bacon.

Tonight, I bought pre-cooked shrimp because I was unsure of the cooking time for shrimp compared to how long the bacon would take. I also didn't want the cheese to be turned to a crisp while waiting for the bacon to cook. To combat this, I cooked the bacon on the stove until it was still soft, but nearly fully cooked. Then, I wrapped a piece of cheese around the shrimp, before wrapping the nearly, fully cooked bacon around it, securing with toothpicks. I used once slice bacon per shrimp. (Note: soak the toothpicks, or at least run under water to moisten, so they do not burn in the oven.)


I placed the 10 shrimp in a 13x9 glass dish and baked at 350 degrees F for about 8 minutes (or until bacon is at desired crispness and cheese has melted).

Can you imagine this deliciousness deep fried too?!
Related Posts Plugin for WordPress, Blogger...