Tuesday, July 31, 2012

Purple Ombre Rosette Cake

I'm not sure if I mentioned this yet, but my friend Michelle and I are taking a calligraphy class. This is something we both have been talking about doing forever and is on my 25 Before 25 List. It is a 6 week class which means we get to spend 2 hours of class time together as well as a little time before and after as it works with my schedule. It has just been delightful. I can't wait until we live closer to one another.

The first day of calligraphy class at the local community college, we walked in and saw a familiar face, Megan, a girl who was in our cake decorating class (Wilton Decorating Basics) last summer at JoAnn's. Our instructor heard us talking about it and nonchalantly said she would love a cake with flowers for her birthday at the end of the month. Well, Michelle and I will jump at any chance to make a cake, so here's what we did.
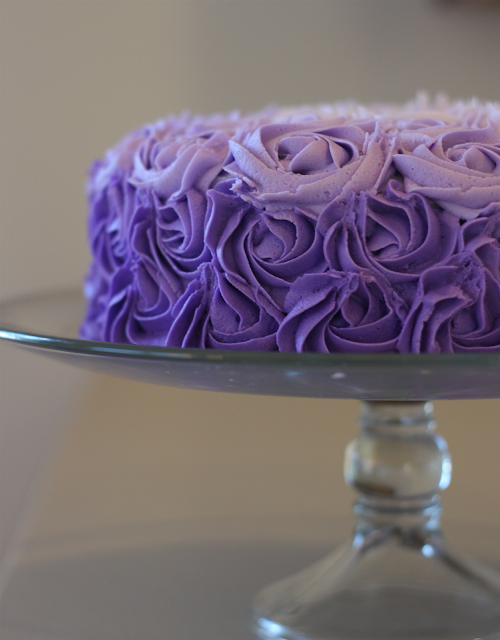
Photo credit: Michelle Waters

It turned out so pretty, dontcha think?

Photo credit: Michelle Waters

Michelle made her vanilla speckled cake from scratch and I made the rosettes in Michelle's delicious buttercream frosting. Dye all of the frosting the lightest shade you desire. The filling and outside of the cake was frosted with the lightest shade of purple we used. Starting in the middle, working your way outwards with as many rows as you want. We did one rosette, circled once, before dying all of the batter the next shade, making one more circle. Repeat until you are finished. It is important not to try to split up the batter and dye different cups in case you need more because matching dyed frosting after the initial dye is very hard. Just dye it darker as you complete your ombre look.

Photo credit: Michelle Waters

I really love the purple. It's one of my favorite colors, but I'm sure pink or maybe even yellow would look wonderful, too!

Photo credit: Michelle Waters

I used a Wilton star tip to frost this cake. I can't recall if it was #18 or #20 but I wasn't as big as a 1M.

Photo credit: Michelle Waters

I really like how the rosettes hide some of the imperfections of my strokes because they are all so close together. Next time, I think I'll make sure the frosting is a little softer because the ends won't look so abrupt. I also plan on trying this out on a cake that is a little taller because then my bottom row of rosettes won't be so smashed.


This post is linked up to some of the parties listed under my Show & Tell tab at the top of the page.
Monday, July 30, 2012

Salted Caramel Butter Bars

I have been wanting to make this recipe for a while but every time I browse my pinterest boards and see it, I never have caramels on hand. Last time I was at the store, I made sure to change that.


You know the drill by now, I love salted caramel anything. Remember? Salted Caramel Muffins, Salted Caramel Fudge and my friend Michelle's Salted Caramel Popcorn or Salted Caramel Chocolate Pie or Salted Caramel Chocolate Chip Cookies. Oh, those salted caramel chocolate chip cookies. Gah. To die for. I need to make some. Stat.

Anyways, back to what I was doing.

Salted Caramel Butter Bars
from Shelly at Cookies & Cups

Ingredients
1 lb salted butter, room temp
1 cup granulated sugar
1 1/2 cups powdered sugar
2 Tablespoons vanilla
4 cups all purpose flour
1 bag (14 oz, about 50) caramels, unwrapped
1/3 cup milk or cream
1/2 teaspoon vanilla
1 Tablespoon coarse sea salt (I used Kosher salt and they tasted great!)

Preheat oven to 325 degrees and prepare a 9x13 inch baking pan with nonstick spray. Beat butter, granulated sugar and powdered sugar until creamy. Mix in vanilla. Finally, sift in your flour and beat on low until dough is soft. Flatten about half of the dough into the bottom of the pan. Put the remaining dough in the refrigerator to chill. Bake crust for 20 minutes, or until edges are slightly golden brown. Let cool in pan on wire rack for 15 minutes.


Allow dough to cool in pan for 10-15 minutes. While the crust is baking and cooling, melt the caramel, milk/cream and vanilla in a microwave safe bowl for about a minute. Stir. Continue heating for 30 second intervals, stirring in between until completely combined.


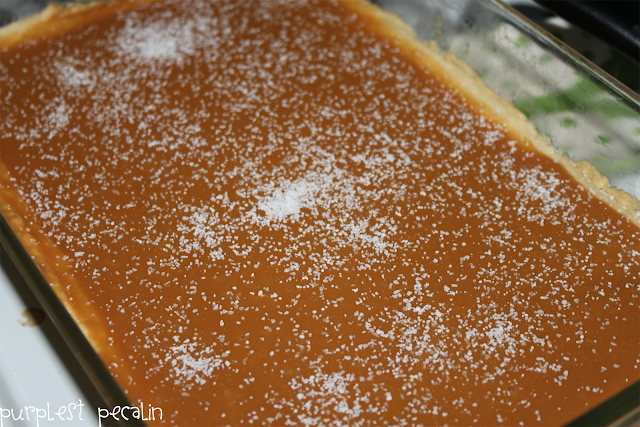
Pour caramel over your baked crust. Sprinkle with salt.


Crumble the rest of the dough on top. Don't worry if it isn't very crumble-y. Mine wasn't, which I'm guessing was due to how warm my house is during the summer. Just chunk it across the top of the caramel. Bake for another 25 minutes, until topping is slightly golden brown and caramel is bubbling.

Allow to cool completely before cutting and removing from the pan to thoroughly enjoy.


Oh, thank you salted caramel for making everything right in the world, if  only for moments at a time.


We took these camping. They were quite a hit and complemented the super rich Snickers Brownies very well.


This post is linked up to some of the parties listed under my Show & Tell tab at the top of the page.

Monday, July 23, 2012

Bacon Maple Cupcakes

Let's start out Monday right, shall we? Oh yes, that's right - with bacon.


We all know, I love bacon. I love maple syrup. I love cupcakes. So it only seems logical that when I saw this recipe from Picky Plate, I had to give it a go. I was soooo not disappointed. It is like the perfect bite of maple syrup covered pancake and bacon.


Also, for all you skeptics out there, you can't tell me you've never gotten a little syrup on your strip of bacon?


I promise all you salty and sweet fans will love these. My sister even said they should have more bacon on them, while her boyfriend noted they are the ultimate man cupcake. I couldn't agree more, with either of them.  

Bacon Maple Cupcakes
from Picky Plate

Ingredients

Cupcakes
1 yellow cake mix
1 box (3.4 ounce) instant vanilla pudding mix
4 large eggs
1/2 cup milk
1/2 cup oil
1/2 cup sour cream
1/2 cup pure maple syrup
12 strips bacon, cooked, crumbled

Maple Buttercream Frosting
1 stick unsalted butter, softened
1/4 cup pure maple syrup
2 3/4 cup powdered sugar
12 strips bacon, crumbled

Preheat oven to 350 degrees and prepare your cupcake tins as you wish. Cook all 24 strips of bacon now, so it can cool and be crumbled.

Mix all of the cupcake ingredients, except bacon crumbles until well combined. Then, stir in bacon crumbles. Divide into cupcake liners, filling 2/3 to 3/4 full, depending on how full you like your cupcakes baked. Bake according to the box, or until tops are golden brown.

Meanwhile, prepare the delicious frosting. Mix butter and syrup until well combined. Beat in powdered sugar slowly, until combined. Frost cooled cupcakes. Top frosted cupcakes with crumbled bacon. Finally, taste all that is delicious and good in the world. You're welcome.


This maple buttercream is an absolute must. To. Die. For. I'm not exaggerating. It has an incredible flavor and so very perfectly compliments the sweet cupcake and the salty bacon. I'm planning on using the frosting for other treats at some point in the future.


Any questions? :)


A big thanks goes out to my step mom for bringing me back the different grades of pure maple syrup from Vermont. As soon as she gave it to me, I knew I wanted to use it in a baking recipe. I love pure maple syrup but hate how much it costs. I really do think it makes a difference in taste if you can afford to use pure maple syrup instead of the corn syrup based ones (check the ingredients list). Your generic grocery story will probably have a pure maple syrup that is less expensive than a brand label, but still 100% pure maple syrup. I know Kroger does. Don't let this stop you from trying this recipe out; I just think the flavor really pops in the frosting especially with the pure maple syrup.


This post is linked up to some of the parties listed under my Show & Tell tab at the top of the page.

Sunday, July 22, 2012

Sunday, July 15, 2012

Speechless Sunday

via thewheatfield by Katie Daisy on Etsy

Just what summer's all about. I need a little more of this...ASAP.

Friday, July 13, 2012

Snickers Brownies

Oh yes.


They are actually even better than the picture. And far, far messier.


I'll be honest, brownies are not one of my top sweet treats pick. I'd pick cookies or cake first.
Snickers bars, however, are one of my favorite candy bars, so this little ditty was just a perfect combination for me. Again, a messy, but so incredibly delectable one.

Do not be afraid of trying this recipe out. It really is very easy. The only part you actually have to bake is the brownie. The rest of it is just assembled in the right order and not difficult at all!

Snickers Brownies
from Jasey's Crazy Daisy

Ingredients:

Brownie Layer
1 box brownie mix + ingredients called for on box (or make your favorite homemade recipe)
1/4 cup hot fudge

Nougat Layer *Adapted from How Sweet It Is
1/4 cup unsalted butter
1 cup granulated sugar
1/4 cup evaporated milk
2 (7 oz.) jars marshmallow creme
1/4 cup peanut butter
1 1/2 cups salted peanuts, roughly chopped
1 teaspoon vanilla

Caramel Layer
1 (17 oz.) jar of caramel [Our store only sold 12 oz. jars, so that's what we used and I thought it was enough.]

Candy Bar Topping
1 1/4 cups chocolate chips
1/4 cup peanut butter.


Bake your brownies according to the box or from scratch to fit a 9x13 inch pan. Add the 1/4 cup hot fudge, unheated, to the batter. Allow brownies to cool completely before assembling the rest.

For the nougat, melt the butter over medium heat. Stir in the sugar and milk until completely dissolved. Bring this mixture to a boil. Now, add your marshmallow cream, peanut butter and vanilla. We only used about 1 1/2 jars of marshmallow cream. Stir until smooth. Turn the burner off and fold in the peanuts. Finally, pour on top of the cooled brownies, using a spatula to spread the nougat to cover all the brownies. Cool completely again. You can stick it in the freezer for 15 minutes if you are antsy.

To prepare the caramel layer, warm caramel in a saucepan over low, until it is easy to stir. Then pour it evenly on top of the nougat. Again, let all of this cool completely. Use the freezer if you just can't wait at this point.

Finally, melt the chocolate chips and peanut butter together in a saucepan over low heat, stirring until smooth. Repeat method of pouring and spreading to cover the previous caramel layer. Cool in refrigerator to allow candy bar chocolate to set before serving.

The chocolate candy bar topping tends to melt quickly, and most likely will in your hands, so store them in a cool place, if not the fridge when not serving because they are apt to ooze. I would even freeze them overnight if you have to take them somewhere. They thaw super fast and will hold together in transport better.


We took these camping, along with the Nutella Stuffed Cookies, a couple weekends ago. When you couldn't resist any longer and finally caved in, the only problem was having to deal with sticky fingers til we made it back down to the water. So worth it.

Update 10/11/12: I have made these 4 times since I posted these because, well they are probably the best brownie recipe ever and people can't get enough of them. Again,  refrigeration or a cooler place is best for these bad boys. They will stay together best until being devoured.

This post is linked up to some of the parties listed under my Show & Tell tab at the top of the page.
Thursday, July 12, 2012

Nutella Stuffed Sugar Cookies

Holy smokes.


I'm not entirely sure I have ever had a better cookie than this. Seriously. Let me tell you, I love me some chocolate chip cookies. These ones are my fave. But this recipe for Nutella Stuffed Sugar Cookies sure is trying to take over as the best cookie ever, and on certain days, they might actually win. Even Bridget from Bake at 350 (where I first saw the recipe) stated they were the best ever. That girl has eaten a lot of cookies, which are insanely impressive by the way. If you've never checked out her blog, do so right after you read the rest of this post.

Nutella Stuffed Sugar Cookies
from Cookin' Canuck (first time on her blog and I'm in love, check it out, too!)

Ingredients
1/2 cup Nutella
1 1/2 cups + 1/3 cup granulated sugar, divided
1 3/4 sticks unsalted butter, softened
2 large eggs
2 tsp vanilla extract
2 1/2 cup all purpose flour
1/2 tsp baking powder
1/2 tsp salt
1 Tbsp sea salt [I used Kosher salt and it tasted just fine.]

Before making any of the dough, you need to scoop little dollops of Nutella onto a cookie sheet lined with parchment paper to freeze. The original recipe suggests 15 minutes in the freezer, our house is pretty warm and I found it much easier to make these cookies after the dollops were frozen for at least an hour. In fact, I made mine the night before.*

I used 1 teaspoon scoops, but I thought they made the cookies too big. I made some using my 1/4 teaspoon scoop and thought that was perfect. If you want big cookies (5-6 inches in diameter), use the 1 teaspoon.


Prepare your baking sheets as you wish. I always use parchment paper on my cookie sheets. Preheat your oven to 350 degrees.

Beat 1 1/2 cups sugar with softened butter, until fluffy - 3 to 5 minutes. Beat in eggs, one at a time. Then stir in the vanilla.

In a separate bowl, whisk flour, baking powder and salt. Slowly, incorporate this dry mixture into the wet one, until just combined.

To assemble cookie dough balls, flatten 1 Tablespoon dough and dip one side of the disk into Kosher salt (or sprinkle 5-6 grains of sea salt) onto flattened side. Add frozen Nutella drop and cover with another Tablespoon of dough, ensuring the Nutella is completely covered. Last, roll the dough ball in your 1/3 cup of sugar and place on baking sheet.

Repeat, spacing cookies 2 inches apart.


Bake the cookies for about 12 minutes, or until edges are golden brown. The tops will not brown. The picture below is what you're going for, as I can assure you, these were just right. Nice crisp edges with soft, Nutella filled middles.


Remove cookies from oven and allow them to cool for at least 5-10 minutes or you might burn your tongue on the Nutella middle.


*On a side note, I have decided the little frozen dollops of Nutella are super yummy tasting cool treats. Very addicting indeed and a very quick way to consume a lot of calories. Not that I was counting.

We took these camping and they held up well in the heat so unfortunately for my waist, I ate a few too many. Fortunately, my tastebuds loved every bite.


This post is linked up to some of the parties listed under my Show & Tell tab at the top of the page.

Wednesday, July 11, 2012

Addison's Memory Quilt

I fiiiiiinally finished Addie's memory quilt. I started cutting...let me think...two whole summers ago. Okay, now that we got that embarrassing fact out of the way, here's the pile of clothes I started with...


...that I widdled down (after a heckuva lot of cutting) to this...

Huge apologies for the insanely good camera phone picture here.

...which ultimately became this, front and back:


All of the clothes were part of Addison's wardrobe when she was 18 months and younger. My sister picked out the ones she wanted and then I based the size of each square on the piece of clothing that had the largest detail I wanted to include, which was the flower with the brown background for the height and the brown love heart for the width. Next, I cut the rest of clothing to match the flower and the heart.


For some blocks, I had to cut different parts of the clothing up to sew together to make blocks, like the puppy dog, the Trail Blazer and the pink flower seen below, because I could not cut a piece large enough from the clothing piece to match the size of the flower block.


Not all the blocks are the same material. A couple are corduroy (far top left below, with buttons), right next to that is a ribbed sweater, the apple is cotton, the snowmen and heart blocks are from fleece pajamas and the stripes are stretchy knit.


The polka dot border was made from her receiving blankets.


My sister chose the backing, which is a soft flannel. It's just so cute.


I gave Addison the blanket at her at her 4th birthday party. I'm making myself a high school one at some point.

I absolutely love it. I wish I had one from my babyhood.


This post is linked up to some of the parties listed under my Show & Tell tab at the top of the page.

Tuesday, July 10, 2012

Peanut Butter and Jelly Bacon Sandwich

A while ago, I had this idea. I wondered how delightful putting a couple slices of bacon on a peanut butter and jelly sandwich might taste...


I have been meaning to try it out for a while now - actually, since Olivia's 1st birthday party when we had leftover bacon from BLTs and the girls were having PB&J sandwiches that night. At my house, we don't always have bacon and when we do, it is generally gone very quickly. A couple weekends ago, we had some on hand so I cooked a couple extra pieces up so I could try it out. My little sister was over at my house and looked at me like I was crazy while I was assembling it.


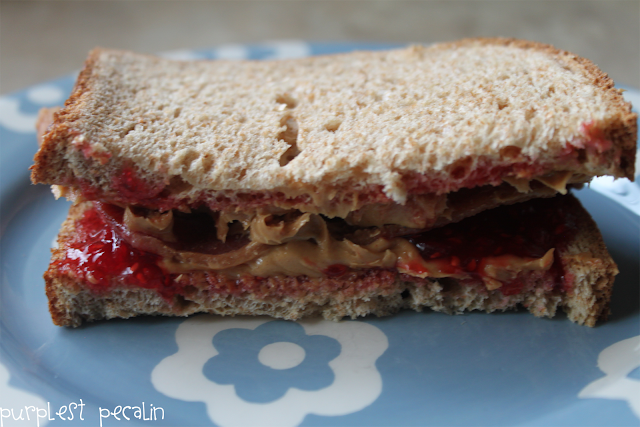
Homemade raspberry jam, spoonful of peanut butter, one slice bacon broken in half between one slice of bread folded in half, makes for a super tasty treat!


I have such a weakness for bacon.


Have you got your bacon cooking yet?

 
Despite my sister's picky palette, she approved! She even said, "Maybe I can get mom to make these for my lunch." To which I said, "You should start making your own lunch." :) You're welcome mom.


But seriously, if you like salty and sweet and bacon and PB&J's separately, you will most likely love this combination. It's a fun way to add a wrinkle to the good ol' reliable PB&J. Let me know what you think!


This post is linked up to some of the parties listed under my Show & Tell tab at the top of the page.

Sunday, July 8, 2012

Speechless Sunday

via deadlink on Pinterest...please let me know if you know the source!

Thursday, July 5, 2012

Dear Addison (4 Years, 1 Month Old)

My friend Michelle writes about her daughters, Ellie and Olivia, in intimate detail, recording the wee things they do as they are growing up. She is recording precious memories I know her girls will cherish. They will know what their momma thought and loved and felt when they were tiny. Not many people get to know these things in such detail. I just love reading them and decided I want to write letters to my niece, Addison so she knows how much I love being part of her life and how I think the world of her. So, here we go.


Dear Addison,

Every so often, you will just come up to me and say the 5 sweetest words I ever hear coming from your pretty little lips: I love you, Auntie Mal. They seem random, out of the blue, with no correlation to what is going on in the world around us – at least from my point of view. But, maybe it was perfectly timed in your own head, why you needed to tell me that at that specific point in time. Or maybe not - I may never know, but every time you say those words, it melts my heart. My guess is that you will have that power for the rest of your life. Please use it often.
You turned 4 years old one month ago today and I still tell people I meet I have the smartest and most adorable 3 year old niece. I have decided to start writing you letters so you will know how insanely much I love you and how stinkin’ cute, funny and smart you were at various stages in your life since you won’t remember. Okay, let’s face it, I probably won’t either and I hate thinking I will forget - and probably already have forgotten plenty since June 5th, 2008.

For more than a year now, you have been creatively filling in the blank in this sentence:

I love you to the _________ and back.

We started with the word moon, as most people do. We did stars and sky and sun. Sometimes, instead of thinking vertically, we will be outside and pick things we could see, closer and then farther away: car, tree, playground, mailbox, etc.  You were very creative sometimes, putting a word in the blank that made absolutely no sense, but made me laugh because I love you to the alien and back was the farthest thing away at that point in time in your brain, or maybe just the silliest.

By the time you are actually reading this, I’m sure you have been told you how crazy big your vocabulary has been since you started talking. Recently, you have been using words like beautiful, amazing and wonderful to describe things. For example, when you opened your My Little Pony figures at your party, you said “Wooooow, she is beautiful” slowly, in awe, as if it was Princess Diana in a ballroom gown.

You are quite dramatic at times, making statements with a big sigh of content like “I have everything I ever want” after your birthday party. 

That’s about the gist of you linguistically at this point in time. Another thing I absolutely love about you is how your motor skills are developing. I bet you’ve seen the video of your first ballet recital, right? If not, make it a priority to watch it. One of my favorite things you do right now is draw. I love watching you draw people since limbs come out of heads and your tongues, oh you should see how you draw tongues. 


You have been able to write your name for a while now. Aside from that, here is what the rest of your writing looks like on one of your birthday invitations you helped with:


Here, you really just decided to go for it:


You can totally wear me out little one, but I cannot even imagine life without you. Thank you for so many smiles and memories. I have lots more to tell you, but figured this is enough for now.

Love you always, forever and without a doubt, 

Auntie Mal

Wednesday, July 4, 2012

Happy Fourth of July!

Right in the middle of the week, right? Just a strange feeling for those of us who didn't get to take the rest of the week off. :)

Here's how our patriotic American birthday went:

We made some festive treats, including white chocolate dipped strawberries with blue sugar tips...


And also, patriotic cake pops - red candy dipped, blue sugar tops and white star sprinkles...


We took these to a family friend's potluck on the water, where we ate, drank, rode on the boat and lit off fireworks.

See the red, white and blue cake slice Addie's eating? Happy birthday to her Papa Rod, too!


Just like last year, we went on a little boat ride.


Addie was super excited with Auntie Sarah.


Here she is, telling Papa what's going on. In fact, she saw a fish before he did.


Then, Auntie Sarah, Kenzie and Addison went on the paddleboat.


I even played with the exposure time on my camera capturing the movement of the sparklers.


We had a blast as usual. Good food, good friends and good family. Not much more a girl could ask for.
Related Posts Plugin for WordPress, Blogger...